Building a Pigeon Loft
by Clint Robertson
When constructing a pigeon loft there are many things you must take into consideration. First is how much money you are willing to spend, how much space you have, and what kind of building codes you may have to take into consideration. Then you will want a loft that will allow your particular variety of pigeons to live comfortable, healthy lives and at the same time let you enjoy and care for them properly. I have seen a wide variety of lofts ranging from simple to elaborate that have worked well and others not so well.
Over the years, through my own experience and by talking to many successful pigeon men I have found that there are some things you will want to do when making a loft. There are some very important issues that effect pigeon health that a loft must provide.
First: A loft must be dry. Moisture and dampness breeds sickness. Second: A loft needs fresh air without drafts, this is essential for the health of both the birds and the fancier. Third: A loft needs to be bright and well lit - preferably with sunlight when possible. There are other requirements but these three are a must. I recently built a new loft which incorporates all of the lessons and requirements I have learned over the years.
First I selected a dry sheltered location. I then used gravel to provide a firm high base to build on. Because we live in a northern climate I wanted the loft to face south to give maximum sunlight. Because rodents and other animals can be a problem I wanted my loft to protect my birds so I built my loft on poles up off the ground about three feet. This allows air flow and light under the loft which discourages intruders such as raccoons, skunks, rats, mink and the like. Having the loft up like this also ensures the loft will stay dry. Something I do not like in a loft is a concrete floor. I have just seen far too many of these that seem to result in health problems in the birds. I believe a wood floor is the best. My loft has a 6 inch insulated wood floor with the surface made of fur plywood.
Before I started actual construction of my loft I went to a window and door salvage company where I found windows and doors that would work for me and I got them at less that 25% of new price. By doing this I was then able to design the loft so these windows would work.
Because I feel sunlight is so important I wanted to make sure that the rays of the sun would be able to reach all parts of the loft. I felt a long narrow loft that allowed sunlight to reach all the way to the back wall would work best. This would also make for simple construction. I prefer many smaller compartments rather than a few large ones in a loft so I can keep different ages, sexes and varieties if birds separate. In the end I decided to make the loft 40 feet long with 5 compartments for birds, each one being 6 feet wide and the width of the loft (8 ft). The remaining 10 feet would provide space for an area for me to study and pen train my birds as well as store feed, shipping containers and so on. The wall between this room and the rest of the loft is solid with a nice sized window that opens into the open loft that can be left open for increased air flow. The door into the loft from this room has windows in it so I have a good view into the rest of the loft through it also. I keep this room heated for the winter months to work on my birds and store things which I do not want to freeze. I had always wanted such an area in a loft and I must say I enjoy my birds much more now that I have this space.
At each end of the loft I have tall narrow windows that open to the outside. This allows for nice air flow throughout the loft when needed. I put wire over the windows on the inside so the birds cannot perch on the window ledge.
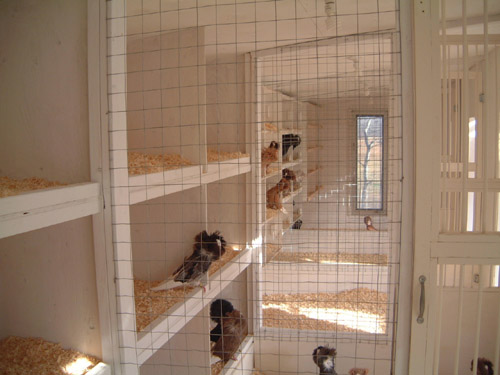
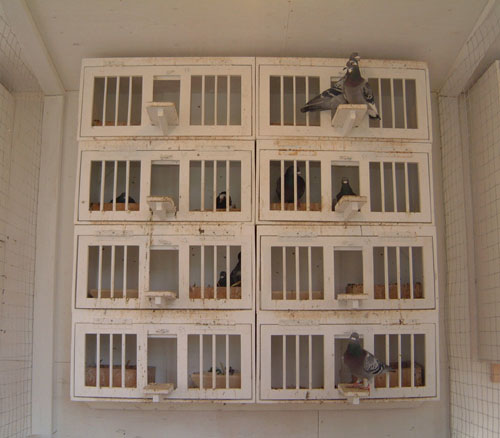
I was told many years ago by one of my pigeon mentors that if I ever built a loft never to make a hallway but rather make it so you have to walk through each compartment to move about the loft. This way your birds will become more quiet and accustomed to you and you will also be able to more quickly see problems among your birds. This I feel was good advice. I also feel that a hallway is wasted space. I constructed all my nest boxes to face south so the north wall is the only wall with no windows. I placed the doors that connect the compartments all along the south wall. The doors between the compartments are framed so they are up off of the floor 4 inches so the bedding material I use does not interfere with the door opening and closing properly. I put spring loaded hinges on all the doors so no other clasps to hold them shut were needed and I can walk about with my hands full and not worry about opening and closing doors. Make sure the doors are made to open towards you when entering the compartments so as not to crush birds or eggs that you cannot see on the opposite side of the door. I am sure sliding doors on rails would work just as well and have the same effect. I also made sure my loft was not too high inside so the birds cannot fly above your reach and avoid being caught and become wild. I can comfortably reach up and touch the ceiling. To separate the compartment I used a 2X4 wood frame with plywood on the bottom high enough so the birds can not see from the floor into the next compartment. Above this I used stucco wire. This allows the most light and air to flow between compartments and I am able to see from one end of the loft to the other and the birds will not climb as bad on this as with chicken wire.
Before I put any of the wire up or placed birds in the loft I painted the entire loft, nest boxes, perches and fly pen frames with a bright coloured quality paint. I used white to make sure the loft stays bright and to make the loft more sanitary and attractive.
Each compartment has a walk through door leading out into a walk in fly pen. The fly pens are the same size as the loft compartments. I put great emphasis on the importance of a fly pen. My fly pen is built on a gravel base with wire trenched into the ground around the outside edge to discourage animals from digging in. The fly pen is built as a lean-to onto the south side of the loft. I have a roof on the fly pen which is made of steel sheeting alternating with clear sheeting so sunlight gets into the loft. I have the ends of the fly pen closed off with a large sliding window at each end which can be left open in good weather or closed in windy or rainy weather. These windows are also covered with wire on the inside to prevent the birds from sitting on the ledge or getting out and to keep predators out. The front of the pen is covered by a heavy gauge 1 inch square mesh. The bottom is solid for about 24 inches off the ground so passing animals cannot easily see in or frighten the birds. I can walk into each fly pen from the outside and up a small set of stairs made out of 2X6s into each compartment. In the winter I close in the front of the fly pen with clear poly and the birds spend most of their time out in them even in winter. I feed and water my birds in the fly pens year round so there is never water or feed in the loft. I rake out the fly pens and put down fresh sand whenever necessary. My loft is wired with lights in every compartment as well as in the fly pens. This way I can feed and water my birds whenever I want on the short winter days. I leave the doors open into the fly pens year round.
My birds really seem to enjoy this loft and I enjoy them more also.
On a smaller scale my oldest son "Justin" recently decided he needed a young birds loft. He did not want to spend much money and did not need anything too big. He had a tree house from when he was small and decided to take it down and fix it up for his birds. In one day with the help of his Grandpa and myself we had it ready. The great part is that we did not buy anything to convert it to a loft. All of the windows and material we used were things we had around the yard and it turned out great. Attached are pictures of both lofts. If you have any questions please feel free to e-mail me at clint@jacobins.ca
Clint Robertson